主机环境预设
本示例中的Kubernetes集群部署将基于以下环境进行。
- OS: Ubuntu 20.04.1
- Kubernetes:v1.20
- Container Runtime: Docker CE 20.10.0
测试环境说明
测试使用的Kubernetes集群可由一个master主机及一个以上(建议至少两个)node主机组成,这些主机可以是物理服务器,也可以运行于vmware、virtualbox或kvm等虚拟化平台上的虚拟机,甚至是公有云上的VPS主机。
本测试环境将由master01、node01、node02和node03四个独立的主机组成,它们分别拥有4核心的CPU及4G的内存资源,操作系统环境均为仅小化部署的Ubuntu Server 20.04.1 LTS,启用了SSH服务,域名为magedu.com。此外,各主机需要预设的系统环境如下:
(1)借助于chronyd服务(程序包名称chrony)设定各节点时间精确同步;
(2)通过DNS完成各节点的主机名称解析;
(3)各节点禁用所有的Swap设备;
(4)各节点禁用默认配置的iptables防火墙服务;
注意:为了便于操作,后面将在各节点直接以系统管理员root用户进行操作。若用户使用了普通用户,建议将如下各命令以sudo方式运行。
ed note: this is an overview of basic memcached use case, and how memcached clients work
Two plucky adventurers, Programmer and Sysadmin, set out on a journey. Together they make websites. Websites with webservers and databases. Users from all over the Internet talk to the webservers and ask them to make pages for them. The webservers ask the databases for junk they need to make the pages. Programmer codes, Sysadmin adds webservers and database servers.
One day the Sysadmin realizes that their database is sick! It’s spewing bile and red stuff all over! Sysadmin declares it has a fever, a load average of 20! Programmer asks Sysadmin, “well, what can we do?” Sysadmin says, “I heard about this great thing called memcached. It really helped livejournal!” “Okay, let’s try it!” says the Programmer.
Our plucky Sysadmin eyes his webservers, of which he has six. He decides to use three of them to run the ‘memcached’ server. Sysadmin adds a gigabyte of ram to each webserver, and starts up memcached with a limit of 1 gigabyte each. So he has three memcached instances, each can hold up to 1 gigabyte of data. So the Programmer and the Sysadmin step back and behold their glorious memcached!
“So now what?” they say, “it’s not DOING anything!” The memcacheds aren’t talking to anything and they certainly don’t have any data. And NOW their database has a load of 25!
NOTE: These commands are new. Please let us know if you run into any trouble with the API or the documentation! The meta protocol is no longer considered experimental, please give it a shot!
NOTE: binary protocol is deprecated. meta protocol is cross-compatible with the text protocol, includes every feature the binary protocol has, and has many enhancements.
Memcached has additional commands which are used to reduce bytes on the wire, reduce network roundtrips required for complex queries (such as anti-dogpiling techniques), expose previously hidden item information, and add many new features. These are in addition to the existing Text Protocol, and can do everything the Binary Protocol could do before.
The full description of the Meta commands are available in the Text Protocol documentation:
This wiki serves as a companion to protocol.txt with use cases and examples of the new commands.
Command Basics
Commands and responses start with a two character code then a set of flags, and potentially value data. Flags may have token data attached to them.
Memcached handles a small number of basic commands.
Full documentation can be found in the Protocol Documentation.
Standard Protocol
The “standard protocol stuff” of memcached involves running a command against an “item”. An item consists of:
- A key (arbitrary string up to 250 bytes in length. No space or newlines for ASCII mode)
- A 32bit “flag” value
- An expiration time, in seconds. ‘0’ means never expire. Can be up to 30 days. After 30 days, is treated as a unix timestamp of an exact date.
- A 64bit “CAS” value, which is kept unique.
- Arbitrary data
CAS is optional (can be disabled entirely with -C, and there are more fields that internally make up an item, but these are what your client interacts with.
No Reply
Most ASCII commands allow a “noreply” version. One should not normally use this with the ASCII protocol, as it is impossible to align errors with requests. The intent is to avoid having to wait for a return packet after executing a mutation command (such as a set or add).
I hope you’re all enjoying the 1.2.6 stable release of memcached. Don’t want to hear no whining about it crashing!
One of the most common questions in memcached land is the ever obnoxious “how do I put my sessions in memcached?”. The long standing answer is usually “you don’t”, or “carefully”, but people often walk the dark path instead. Many libraries do this as well, although I’ve seen at least one which gets it.
This isn’t as huge of a deal as people make it out to be. I’ve been asked about this over the mailing list, in IRC, in person, and even in job interviews. What people end up doing gives me the willies! Why! Why why why… Well, I know why.
So what is the deal with sessions? Why does everyone want to jettison them from mysql/postgres/disk/whatever? Well, a session is:
- Almost always larger than 250 bytes, and almost always smaller than 5 kilobytes.
- Read from datastore for every logged in (and often logged out) user for every dynamic page load.
- Written to the datastore for every dynamic page load.
- Eventually reaped from the database after N minutes of inactivity.
Ok well that sucks I guess. Every time a user loads a page we read a blob row from mysql, then write a blob row back. This is a lot slower than row without blobs. Alright, so I see it now. Memcached to the rescue!
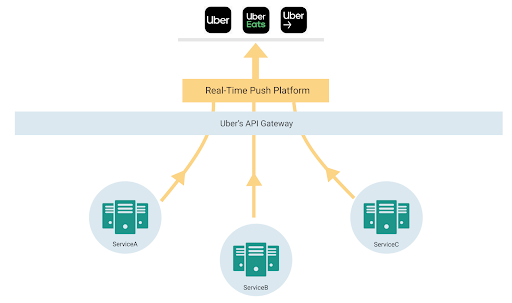
Uber builds multi-sided marketplaces handling millions of trips every day across the globe. We strive to build real-time experiences for all our users.
The nature of real time marketplaces make them very lively. Over the course of a trip, there are multiple participants that can modify and view the state of an ongoing trip and need real-time updates. This creates the need to keep all active participants and apps synced with real-time information, whether it’s through pickup time, arrival time, and route lines on the screen, or nearby drivers when you open the app.
A key dimension of growth was feature explosion in critical user screens and the need for developers across the company to build real-time mobile features in a decentralized way on a shared app screen.
This article describes how we went from polling for refreshing the app to a gRPC-based bi-directional streaming protocol to build our app experience.
mac系统下的Rootless机制,让我们在root权限下也不能随心所欲的读写所有路径了,特殊情况下我们需要关闭Rootless时,可尝试如下操作:
-
重启按住 Command+R,进入恢复模式,打开Terminal;
-
键入命令 csrutil disable;
-
再次重启,即可对 usr/bin 目录下文件进行修改;
-
如果要恢复保护机制,重新进入保护模式,输入 csrutil enable;
Rootless机制是对抗恶意程序的最后防线,除非特殊需要时我们才将其关闭,否则保持开启状态
Mac OS中主要有三种包管理工具:MacPorts,Homebrew,Fink。这里简介Homebrew和MacPorts的区别:
MacPorts:
因为 Mac OS 源自 BSD,因此将 BSD 中的 Port 移植到 OS 成为 MacPorts 就一点不奇怪。MacPorts 会独立于 OS 自建一套仓库树,OS 的包执行目录为 /usr/local,而 MacPorts 的包执行目录为 /opt/local。MacPorts 尽量不影响系统现有程序,自然也就尽量少复用系统已有程序。MacPorts 安装包的过程是下载该程序的所有源文件及其依赖包,然后在本地进行 Build 生成最终的可执行文件。这样做的好处是在系统中存在一套独立的生态环境,从而不影响系统自身的生态环境,缺点就是浪费了系统自身的生态资源。
Homebrew:
在 Lion 之后兴起的包管理工具,工作方式与 MacPorts 类似,下载源代码然后本地 Build。不同之处在于 Homebrew 采取与 MacPorts 截然相反的态度,对系统资源是最大程度的利用,因此可以说 Homebrew 是直接对现有系统生态环境进行修改,所有包也是直接安装到现有的生态环境中,这样做的好处是节约了系统资源,但缺点是每一次操作都是直接对系统进行修改,严重依赖和影响现有系统。
使用 MacPorts 和 Homebrew 都需要预装 XCode Command Line Tools,即意味着还需要提前预装 XCode。(根据官方文档来看,Fink 安装比较新的工具包时,因为提前编译完成所以无需依赖 XCode,但对于一些不是二进制的包,如果需要本地编译,还是需要依赖 XCode。换而言之,如果想在 OS 中编译源码,都需要 XCode 提供支持)
---types---
/////
//
// Serialized binary TL-schema in vkext format
//
/////

tls.schema_v2 version:int date:int types_num:# types:types_num*[tls.Type] constructor_num:# constructors:constructor_num*[tls.Combinator] functions_num:# functions:functions_num*[tls.Combinator] = tls.Schema;

tls.type name:int id:string constructors_num:int flags:int arity:int params_type:long = tls.Type;
tls.combinator name:int id:string type_name:int left:tls.CombinatorLeft right:tls.CombinatorRight = tls.Combinator;
tls.combinatorLeftBuiltin = tls.CombinatorLeft;
tls.combinatorLeft args_num:# args:args_num*[tls.Arg] = tls.CombinatorLeft;

tls.combinatorRight value:tls.TypeExpr = tls.CombinatorRight;

tls.arg id:string flags:# var_num:flags.1?int exist_var_num:flags.2?int exist_var_bit:flags.2?int type:tls.TypeExpr = tls.Arg;

tls.exprType _:tls.TypeExpr = tls.Expr;
tls.exprNat _:tls.NatExpr = tls.Expr;

tls.natConst value:int = tls.NatExpr;
tls.natVar dif:int var_num:int = tls.NatExpr;

tls.typeVar var_num:int flags:int = tls.TypeExpr;
tls.array multiplicity:tls.NatExpr args_num:# args:args_num*[tls.Arg] = tls.TypeExpr;
tls.typeExpr name:int flags:int children_num:# children:children_num*[tls.Expr] = tls.TypeExpr;
---functions---